背景
为了避免网站出现劫持现象,使网站更加安全、可靠,现在大部分网站都增加了 HTTPS 证书,但是对与个人小网站来说,证书问题有以下几个痛点:
- 收费证书普遍较贵
- 阿里云域名免费证书只支持单域名
- 证书有效期通常为一年,到期需要人工更换
为了解决以上几个痛点,于是对SSL免费证书及其自动化方案进行了研究和探究,发现了一家证书颁发的公益机构 - Let's Encrypt
基本介绍
Let's Encrypt 是一家免费、开放、自动化的证书颁发机构(CA),为公众的利益而运行,致力于创建一个安全、绿色、尊重隐私的 Web 环境。有以下几个重要特点:
- 免费
- 安全
- 透明
- 自动化
部署方案
基于 Let's Encrypt 提供的免费证书服务,结合 acme.sh 工具脚本,从而实现HTTPS免费证书的自动化操作。
主要步骤:
- 安装脚本
- 生成证书
- 安装证书
- 配置证书
- 自动化更新
安装脚本
推荐使用 root 账号并在主目录进行操作,防止后期出现文件权限问题。1)拉取
root@2c3b212113cb:~# git clone https://github.com/acmesh-official/acme.sh.git
Cloning into 'acme.sh'...
remote: Enumerating objects: 13374, done.
remote: Counting objects: 100% (436/436), done.
remote: Compressing objects: 100% (243/243), done.
remote: Total 13374 (delta 254), reused 344 (delta 193), pack-reused 12938
Receiving objects: 100% (13374/13374), 5.06 MiB | 816.00 KiB/s, done.
Resolving deltas: 100% (8016/8016), done.
2)安装
root@2c3b212113cb:~/acme.sh# ./acme.sh --install -m double.he@qq.com
[Wed Jun 16 06:56:00 UTC 2021] Installing to /root/.acme.sh
[Wed Jun 16 06:56:00 UTC 2021] Installed to /root/.acme.sh/acme.sh
[Wed Jun 16 06:56:00 UTC 2021] Installing alias to '/root/.profile'
[Wed Jun 16 06:56:00 UTC 2021] OK, Close and reopen your terminal to start using acme.sh
[Wed Jun 16 06:56:00 UTC 2021] Installing cron job
1 0 * * * "/root/.acme.sh"/acme.sh --cron --home "/root/.acme.sh" > /dev/null
[Wed Jun 16 06:56:00 UTC 2021] Good, bash is found, so change the shebang to use bash as preferred.
[Wed Jun 16 06:56:00 UTC 2021] OK
说明:此时脚本已经安装成功了,通过上面可以看出增加了一个 alias 和 cron(用于证书的自动化更新)。
生成证书
脚本安装成功之后,就可以进行证书自动化的后续工作啦。该脚本根据使用场景为免费证书的生成提供了多种方式,下面主要介绍以下两种常用的方式:
方式一:HTTP文件验证
通过在项目目录生成校验文件(./.well-known/acme-challenge/xxx),完成证书的校验工作,并在校验完成之后自动删除,操作如下:
root@2c3b212113cb:~# acme.sh --issue -d testssl.dandy.fun -w /data/www/testssl/
[Wed Jun 16 06:57:00 UTC 2021] Single domain='testssl.dandy.fun'
[Wed Jun 16 06:57:01 UTC 2021] Getting domain auth token for each domain
[Wed Jun 16 06:57:04 UTC 2021] Getting webroot for domain='testssl.dandy.fun'
[Wed Jun 16 06:57:04 UTC 2021] Verifying: testssl.dandy.fun
[Wed Jun 16 06:57:05 UTC 2021] Success
[Wed Jun 16 06:57:05 UTC 2021] Verify finished, start to sign.
[Wed Jun 16 06:57:05 UTC 2021] Lets finalize the order, Le_OrderFinalize: https://acme-v02.api.letsencrypt.org/acme/finalize/82281503/2865211519
[Wed Jun 16 06:57:06 UTC 2021] Download cert, Le_LinkCert: https://acme-v02.api.letsencrypt.org/acme/cert/03d9049d92141e7148a53ae0db65d7ec71c8
[Wed Jun 16 06:57:07 UTC 2021] Cert success.
说明:
-d- 指定证书用于的域名-w- 指定域名指向的项目根目录
方式二:DNS-API验证
通过 DNS 服务商提供 key 与 secret 利用 api 实现自动验证,例如阿里云域名,可前往阿里云控制台申请子账号 API TOKEN,操作如下:
root@2c3b212113cb:~# export Ali_Key="sdfsdfsdfljlbjkljlkjsdfoiwje"
root@2c3b212113cb:~# export Ali_Secret="jlsdflanljkljlfdsaklkjflsa"
root@2c3b212113cb:~# acme.sh --issue -d *.dandy.fun --dns dns_ali
[Wed Jun 16 07:00:00 UTC 2021] Creating domain key
[Wed Jun 16 07:00:00 UTC 2021] The domain key is here: /root/.acme.sh/.dandy.fun/.dandy.fun.key
[Wed Jun 16 07:00:00 UTC 2021] Single domain='.dandy.fun'
[Wed Jun 16 07:00:00 UTC 2021] Getting domain auth token for each domain
[Wed Jun 16 07:00:04 UTC 2021] Getting webroot for domain='.dandy.fun'
[Wed Jun 16 07:00:04 UTC 2021] Adding txt value: DVLbPlYPZ3HlHauJIFYVWs5wCDzft9vX4ZysmnWS_A4 for domain: _acme-challenge.dandy.fun
[Wed Jun 16 07:00:06 UTC 2021] The txt record is added: Success.
[Wed Jun 16 07:00:06 UTC 2021] Let's check each dns records now. Sleep 20 seconds first.
[Wed Jun 16 07:00:27 UTC 2021] Checking dandy.fun for _acme-challenge.dandy.fun
[Wed Jun 16 07:00:28 UTC 2021] Domain dandy.fun '_acme-challenge.dandy.fun' success.
[Wed Jun 16 07:00:28 UTC 2021] All success, let's return
[Wed Jun 16 07:00:28 UTC 2021] Verifying: .dandy.fun
[Wed Jun 16 07:00:31 UTC 2021] Success
[Wed Jun 16 07:00:31 UTC 2021] Removing DNS records.
[Wed Jun 16 07:00:31 UTC 2021] Removing txt: DVLbPlYPZ3HlHauJIFYVWs5wCDzft9vX4ZysmnWS_A4 for domain: _acme-challenge.dandy.fun
[Wed Jun 16 07:00:34 UTC 2021] Removed: Success
[Wed Jun 16 07:00:34 UTC 2021] Verify finished, start to sign.
[Wed Jun 16 07:00:34 UTC 2021] Lets finalize the order, Le_OrderFinalize: https://acme-v02.api.letsencrypt.org/acme/finalize/82281503/2865211319
[Wed Jun 16 07:00:36 UTC 2021] Download cert, Le_LinkCert: https://acme-v02.api.letsencrypt.org/acme/cert/03d9049d92141e7148a53ae0db65d7ec71c8
[Wed Jun 16 07:00:37 UTC 2021] Cert success.
说明:该方式是通过域名服务商提供的 API 接口,自动创建 TXT 解析从而完成校验工作的。
两种方式有什么区别呢?
- 如果要生成泛域名证书,那么只能使用第二种方式。
- 如果服务做了外网访问限制,那么只能使用第二种方式,因为无法访问校验文件,会导致校验失败。
安装证书
通过上面命令生成的证书文件会放在 ~/.acme.sh 目录下,注意不要使用该目录下的证书直接配置 SSL ,而要使用命令的方式进行证书文件的迁移,然后再进行 Apache 、Nginx 的证书配置,操作如下:
acme.sh --installcert -d testssl.dandy.fun \
--key-file /data/app/nginx/conf/cert/testssl.dandy.fun.key \
--fullchain-file /data/app/nginx/conf/cert/testssl.dandy.fun.cer \
--reloadcmd "service nginx force-reload"
说明:
- 以上命令将会把
~/.acme.sh/testssl.dandy.fun目录下的证书文件,拷贝到指定目录/data/app/nginx/conf/cert/ reloadcmd用于重启服务,加载新的证书文件,当证书更新以后,会自动调用并重启服务从而让服务生效- 整个过程会被记录下来, 并在将来证书自动更新以后, 被再次自动执行
配置证书
上述命令将证书迁移到了 /data/app/nginx/conf/cert/ 目录,接下来根据不同的服务器进行常规的证书配置即可,这里不做过多介绍啦。
自动化更新
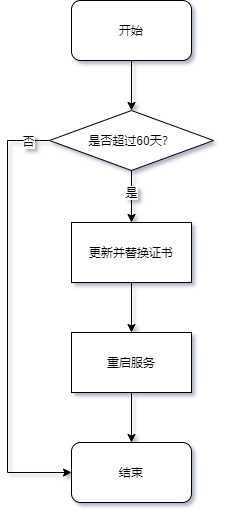
通过以上的操作,免费证书生成及自动更新部署工作全部完成,脚本会通过 cron 脚本定期检查是否过期,过期时会自动执行更新逻辑,替换新的证书并重启相关服务,从而达到自动化的效果。
扩展知识
常用命令
acme.sh --list- 查看所有证书信息acme.sh --renew -d testssl.dandy.fun --force- 强制更新证书acme.sh --remove -d testssl.dandy.fun- 停止证书更新(证书文件不会清除)acme.sh --upgrade- 更新脚本acme.sh --upgrade --auto-upgrade- 自动更新脚本acme.sh --upgrade --auto-upgrade 0- 停止脚本自动更新acme.sh --update-account --accountemail xx@qq.com- 增加过期前邮件提醒
一些问题?
1、负载均衡情况下偶尔校验失败?
原因:使用 方式一:HTTP文件验证 时,如果域名做了负载均衡,在生成或更新证书时,可能遇到这种情况:校验文件生成在 A 服务器,但校验时访问到 B 服务器了,因此导致校验失败证书无法生成或自动更新。
解决方案:HTTP文件验证逻辑是首先生成校验文件 .well-known/acme-challenge/xxx 到项目根目录,然后通过域名请求该文件是否存在,如果存在则校验成功,否则失败。因此我们可以采用 nginx 反向代理的方式来完成多台服务器负载均衡下的文件验证。(ps:也可以改用 DNS-API验证 的方式)
操作步骤:
location ~ "/.well-known/acme-challenge/" {
    proxy_pass http://xxx.xxx.xxx.xxx:80;
}
2、部分设备下第一次打开网站时速度过慢?
原因:LE证书的吊销状态检查域名( ocsp.int-x3.letsencrypt.org 以及相关 CName 或 Alias )在大陆受到劫持引起的。
解决方案:在服务器上配置OCSP(SSL Stapling)功能,强制让浏览器使用服务器提供的OCSP状态,而不是由浏览器去检查。
操作步骤:
- 修改服务器HOST文件,
vim /etc/hosts添加23.44.51.8 ocsp.int-x3.letsencrypt.org - 开启
Nginx SSL Stapling功能,添加 nginx 配置:ssl_stapling on; ssl_stapling_verify on; - 重启Nginx:
service nginx reload - 验证开启是否成功:http://web.chacuo.net/netocspstapling